- Go to your Outlook mail settings from Start > Control Panel > Mail > Show Profiles > Add. If you cannot locate the Mail icon in Windows Control Panel, turn on Classic View (click Classic View on the left side of the Control Panel window).
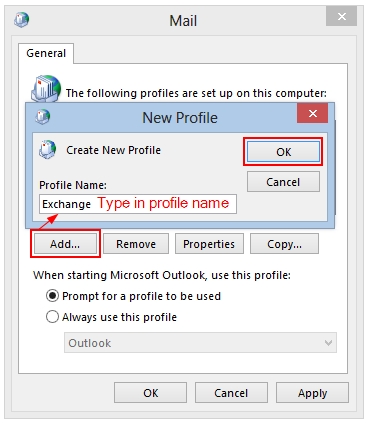
- Specify your Profile Name and click OK..
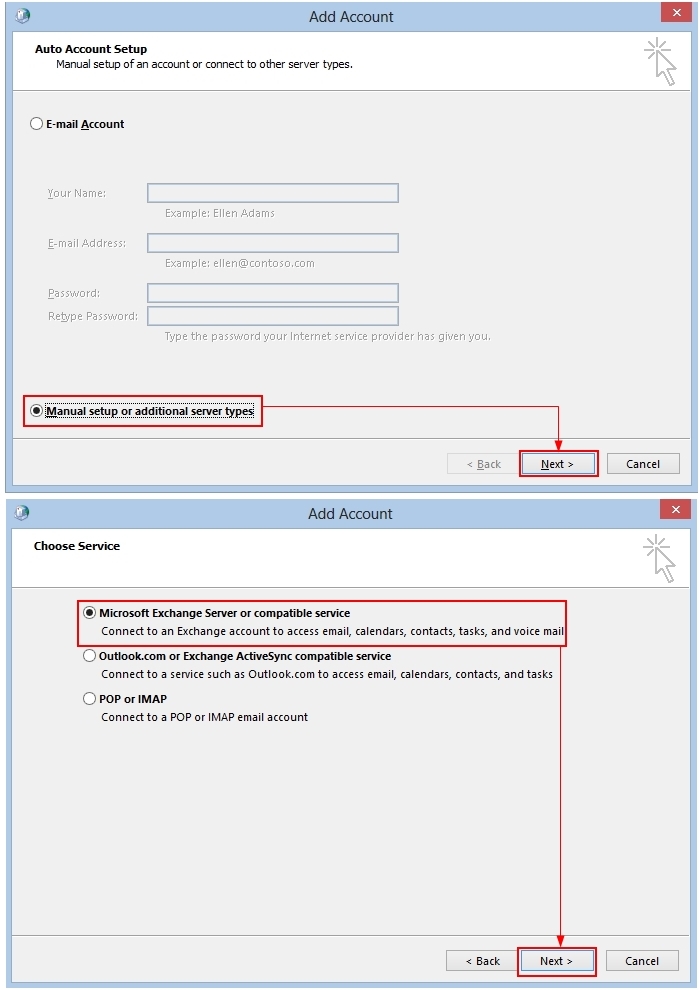
- On the Auto Account Setup page, select Manually configure server settings or additional server types and then click Next.
- On the Choose Service page, select Microsoft Exchange or compatible service and click Next.
.
- On the Server Settings page:
- Specify your Server FQDN as Exchange server name (you can find it in HostPilot® Control Panel > Users & Services > Advanced Settings).
- Type your Exchange Mailbox Username (email address).
- For the Offline use option, make sure that Use Cached Exchange Mode is selected.
- Click the More Settings button and switch to Connection tab.
- In Outlook 2013 you can specify the time period for which email items will be kept offline.

..
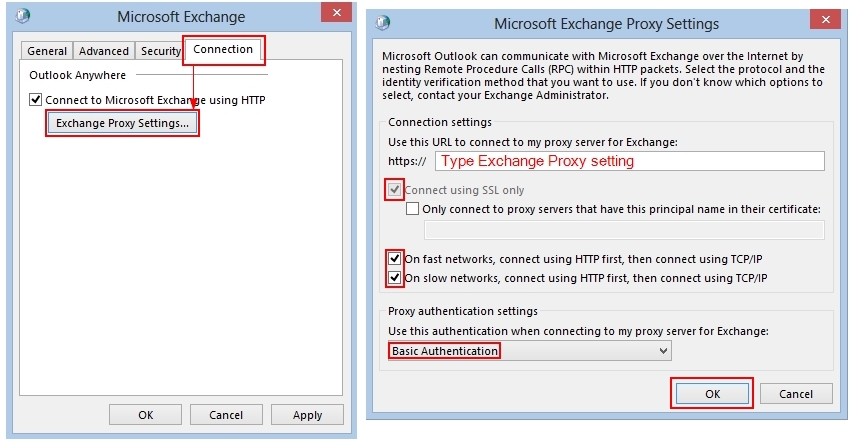
- Select the Connect to Microsoft Exchange using the HTTP option and click the Exchange Proxy Settings button.
- Specify Exchange proxy settings.
- Type the URL for your proxy server in the Use this URL to connect to my proxy server for Exchange field.
- You can find the correct URL in HostPilot > Users & Services > Advanced Settings.
- Make sure that both the options On fast networks and On slow networks are checked.
- In the Proxy authentication settings box, choose Basic Authentication.
.
- If you want to have Outlook save your password, read the Knowledge Base article on How do I save my Outlook Password? for more information.
- Click OK, then Apply, then OK to return to the Add New Account window. Click Check Name. If you have set everything up properly, you will see a window requesting authentication.
- Enter the complete primary email address as the username, and enter the password for the mailbox. If you have entered the username and password correctly, the username will now be underlined, and the entry in the Microsoft Exchange Server field will also be underlined. Note: If your server is Exchange 2013 the server name will get underlined and will resolve into a name that looks like20250514-db52-4776-b627-0edf7599bbe4@YourDomainName.com. Such a conversion is expected behaviour for Exchange 2013 mailboxes.
- Click Next, then Finish, then OK to save changes.
- Start Outlook and log in, using the same credentials as in step 9.
Outlook Mac SETUP
Currently Public Folders on Exchange 2013 are not supported in Outlook 2011 for Mac. Microsoft is working towards resolution.
Note: Outlook 2011 downloaded from the HostPilot® Control Panel or My Services does notrequire product key.
If you have MS Office 2011 installed on your Mac or Outlook 2011 is prompting for a product key, please follow the below steps:
- Uninstall MS Office 2011.
- Install Outlook 2011 downloaded from HostPilot as a stand-alone version and configure the account.
- Install MS Office 2011 back if needed.
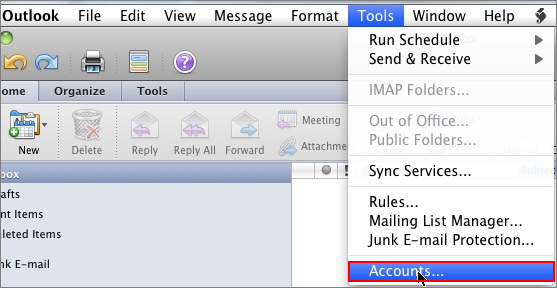
- Open Outlook and navigate to Tools > Accounts.
 Tools > Accounts">
- In the Accounts window, click the plus sign '+' in the lower left-hand corner and choose Exchange.
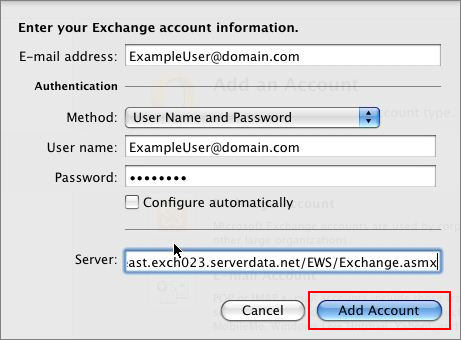
- In the new window, fill in the following fields, then click on Add Account.
- E-mail address: Enter your primary email address (UPN) for your Exchange mailbox.
- Method: Select User Name and Password.
- User name (use one of the following):
- Type your mailbox username in Domain\Username format. Read the Knowledge Base article on What Is My Username And Primary E-mail Address For My Exchange 2007/2010/2013 Mailbox? for more information.
- Type your primary email address.
- Password: Type your mailbox password.

- Outlook will attempt to determine settings for the new Exchange account automatically. For this step, the instructions depend on whether you have Autodiscover record set up:
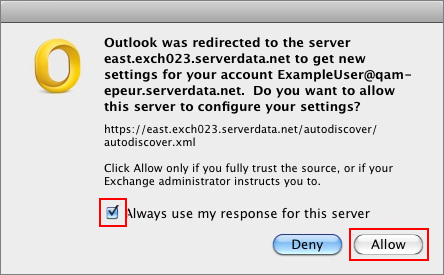
- If an Autodiscover record is configured for the domain name, Outlook will determine settings automatically. You will get a prompt such as the one below. Select the option 'Always use my response for this server' and click on Allow.
- Important: you will still need to configure Directory Service to perform Global Address List lookups. Please skip to step 5.
- If no Autodiscover record exists for the domain, Outlook 2011 will prompt you for the server name. To find out the correct server name:
- Exchange 2007: It should be similar to https://owa0xx.serverdata.net/EWS/Exchange.asmx, where owa0xx.serverdata.net is an Exchange Proxy Server (you can look it up on the HostPilot > Get Started page, under Advanced settings).
- Exchange 2010/2013: In HostPilot, navigate toGet Started > Step 2 > Entourage Setup Instructions > Step 4 > If no Autodiscover record exists for the domain. It should be similar to https://west.exchXXX.serverdata.net/EWS/Exchange.asmx wherewest.exchXXX.serverdata.net is your Exchange Proxy Server and west. or east. depends on your Default Exchange Server.
- To perform Global Address List lookups, you need to configure Directory Service. To do this, navigate to Outlook > Tools > Accounts, select the newly created Exchange account, and click the Advanced buttonin the lower right-hand corner of the window.
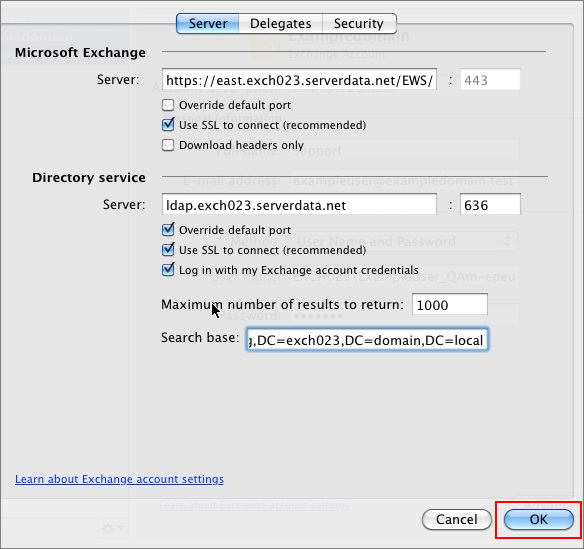
In the Server section, under Directory service:
- Make sure that the Override default port and Login with my Exchange account credentials options are checked.
- The option Use SSL to connect (recommended) should be checked.
- Change the port number to 636.
- Server and Search base: Type in your server and search base. To find the correct settings for your account:
- Exchange 2007:
- Navigate to HostPilot > Home > Get Started Here! > Step 2 > Setup instructions (under Download Entourage or Outlook 2011 (MAC)).
- Exchange 2010:
- See the following table. The correct values depend on the Exchange Domain your account is located in. To find the correct Exchange Domain, navigate to HostPilot > Get Started Here! > Advanced Settings.
- Exchange 2013:
- Navigate to HostPilot > Home > Get Started Here! > Step 2 > Setup instructions (under Download Entourage or Outlook 2011 (MAC)).
| Value for EXCH021 | OU=ExchangeAccountUsername,OU=Hosting,DC=exch021,DC=domain,DC=local | ldap.exch021.serverdata.net |
For Outlook 2013, you will need to set the Root folder path: INBOX in advanced settings:

IMAP/POP SETUP
INBOUND:
mail021-1.exch021.serverdata.net
user:
SSL / 993
OUTBOUND
mail021.exch021.serverdata.net
Use TLS / 465
An example of a manual setup for Android using Exchange (not IMAP):

